这篇文章是应一位Reddit网友编写的,因此以英文为主了,中文版在后半段
Background & Motivation
I’m a game development engineer, mainly working on client-side development using engines such as Unity or Unreal (which unfortunately means my working platform is almost always locked to Windows 😢). Over the past many years, my choice of programming tools has gone through several major evolutions, roughly falling into the following stages:
Visual Studio / CodeWarrior / Xcode
During the first four years of my career, I primarily worked on console game development for platforms like PSP and Wii. At that time, I mostly used the officially recommended tools for each platform—essentially “out of the box” solutions. However, editors of that era were nowhere near today’s standards in terms of code intelligence or debugging capabilities.
Sublime Text
Later on, I started learning Vim. The emergence of Sublime Text, along with its decent support for Vim motions, allowed me to enter the Vim world with a relatively gentle learning curve. For about six years, Sublime Text was my main editor for daily development. Only when debugging was absolutely necessary would I reluctantly open Visual Studio (yes, I’m a logger).
Visual Studio / Rider
In the following years, I frequently had to switch between different projects, and intelligent code completion became increasingly important. As a result, I returned to Visual Studio (with VsVim). Around 2020, I discovered Rider and was genuinely impressed. At that time, Rider felt like a perfect blend of intelligence, speed, and aesthetics. Its Vim plugin, IdeaVim, was among the best I had used—remarkably, it even supported function navigation in Unity shaders. Coding during those years was truly enjoyable.
Neovim
During the GVim era, I never invested serious effort into configuration. While it offered a first-class Vim experience, but it lagged far behind in many other aspects. The emergence of Neovim changed this dramatically, thanks to its support for LSP and DAP (credit to VSCode). Over roughly a year and a half of gradual tweaking, I managed to configure Neovim into a highly usable state. Meanwhile, Rider started performing worse and worse in my work projects—slow startup times, frequent memory usage exceeding 10 GB, and even memory leak issues in recent versions…
So by the end of 2025, I finally made the decision to officially replace Rider with Neovim as my primary “IDE” in my work environment.
Neovim Basic Setup
Everyone’s Neovim setup is different, and that’s precisely its biggest charm—customizing appearance, keymaps, and essential plugins. If we were to explain everything in detail from scratch, it could easily turn into tens of thousands of words. Therefore, this article won’t cover the basics.
If you’re new to Neovim, I highly recommend watching Josean’s YouTube tutorials:
- How I Setup Neovim To Make It AMAZING in 2024: The Ultimate Guide
- How to Setup Neovim LSP Like A Pro in 2025 (v0.11+)
His videos are very beginner-friendly and detailed, and should be more than enough to get you started with a solid base configuration.
LSP and DAP
If you want Neovim to work well with Unity projects, this is the core part of the article. In fact, there aren’t many related articles online—probably because I guess there are only very few Unity developers use Neovim as their primary development tool 😆.
LSP stands for Language Server Protocol, which provides intelligent code features such as completion and navigation. DAP stands for Debug Adapter Protocol, a standardized interface for debuggers. Both protocols were proposed and popularized by VS Code. Because they are open standards, they benefit many modern open-source editors, including Neovim, Helix, and Zed. Their support for code intelligence and debugging relies heavily on LSP and DAP.
The key to making Neovim work well for Unity development lies in configuring LSP and DAP properly.
LSP: Roslyn.nvim
When I first configured C# support in Neovim, I used OmniSharp. The experience was not very satisfying, mainly in terms of performance. In slightly larger projects, jumping to a function definition could take 1–2 seconds.
I’m not entirely sure whether this was due to my own misconfiguration (since OmniSharp now also uses Roslyn internally), but at the time, it felt inadequate for serious use.
Later, I discovered a relatively new Neovim LSP plugin based on Roslyn : Roslyn.nvim
Update 2026/03/09: The original Roslyn.nvim plugin was primarily built for .NET projects. It has some issues with Unity project support, and the original author does not want to significantly change the plugin’s logic (via PRs). So I made many Unity-focused changes in my fork, and I now recommend using the version from my forked repository.
At the moment, the recommended approach is to use the Roslyn LSP–based plugin Roslyn.nvim.
Unity-focused optimizations and improvements in this plugin compared to the upstream repository:
- A more robust sln/csproj selection mechanism
- When it can’t automatically choose among multiple sln/csproj files, it shows a popup asking the user to select one
- Proper support for opening multiple sln files within the same session
- Provides
:Roslyn configto dynamically switch the project configuration - By default, code guarded by inactive macros is highlighted in “gray”
Its initialization speed and function navigation performance are impressive, and it also supports advanced LSP features such as inlay hints.
Ramboe has some excellent videos on his YouTube channel introducing this plugin:
- Neovim + C# in 2025: Roslyn LSP Changes Everything
- Neovim + C# in 2025: The Actually Improved Setup : roslyn.nvim + rzsl.nvim
His videos also cover some DAP configuration, but it mainly targets .NET projects rather than Unity. Still, they are very helpful for understanding how DAP works, which will be useful later.
Back to LSP: fortunately, Roslyn.nvim supports both .NET and Unity projects. Below is how I configure Roslyn.nvim in my Neovim setup.
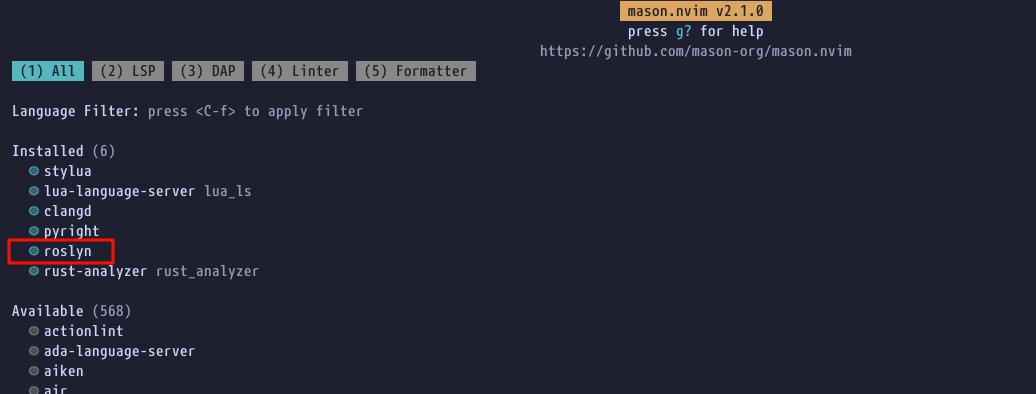
First, you need to add Roslyn to your Mason configuration (Josean’s first video explains Mason in detail). Because currently, Roslyn is not officially included in Mason’s default registry.
require("mason").setup({
    registries = {
        "github:mason-org/mason-registry",
        "github:Crashdummyy/mason-registry",
    },
})
After that, you can open the Mason menu with :Mason and install Roslyn.
Then, add the Roslyn.nvim plugin via Lazy:
return {
    "seblyng/roslyn.nvim",
    ft = { "cs" },
    opts = {
        -- your configuration comes here; leave empty for default settings
        filewatching = "off", -- currently other options lead huge performance dropping
    },
}
The default value of filewatching is “auto”, which has been the main issue I’ve encountered with Roslyn.nvim so far. In my work project, there are already over 100,000 C# source files. With the default setting, every file save causes a 2–3 second freeze. For now, I work around this by disabling file watching.
The trade-off is that after certain file changes, I occasionally need to manually restart the LSP server using a keymap:
vim.keymap.set("n", "<leader>lr", function()
    vim.cmd("LspRestart")
end, { noremap = true, desc = "Restart LSP Server and enable Copilot" })
Finally, you may want to configure the detailed LSP settings in after/lsp/roslyn.lua (the Neovim 0.11+ approach; see Josean’s second video):
return {
    settings = {
        ["csharp|inlay_hints"] = {
            csharp_enable_inlay_hints_for_implicit_object_creation = true,
            csharp_enable_inlay_hints_for_implicit_variable_types = true,
            csharp_enable_inlay_hints_for_lambda_parameter_types = true,
            csharp_enable_inlay_hints_for_types = true,
            dotnet_enable_inlay_hints_for_indexer_parameters = true,
            dotnet_enable_inlay_hints_for_literal_parameters = true,
            dotnet_enable_inlay_hints_for_object_creation_parameters = true,
            dotnet_enable_inlay_hints_for_other_parameters = true,
            dotnet_enable_inlay_hints_for_parameters = true,
            dotnet_suppress_inlay_hints_for_parameters_that_differ_only_by_suffix = true,
            dotnet_suppress_inlay_hints_for_parameters_that_match_argument_name = true,
            dotnet_suppress_inlay_hints_for_parameters_that_match_method_intent = true,
        },
        -- so far we use symbol-usage.nvim for this function
        -- ["csharp|code_lens"] = {
        -- 	dotnet_enable_references_code_lens = true,
        -- },
    },
}
DAP: nvim-dap
Ramboe’s videos already cover the basics of setting up nvim-dap. Installing and using the plugin itself is not particularly difficult. What tends to be intimidating is installing and configuring the language-specific DAP tools.
Fortunately, the nvim-dap team maintains an official Debug Adapter installation Wiki
In general, the process involves downloading the DAP tool for your language (usually adding it to your PATH), and then using the default configuration provided in the wiki. I say “barely works” because for many languages—such as C#, Rust, and C++—you still need to manually specify the executable to debug when launching a session.
If you look closely, you’ll also find a section in the wiki describing how to set up a Unity Dap Debugger. Unfortunately, in my experience, that method is already outdated. The Unity debugger used by VS Code has transitioned from a Unity-authored tool to a Microsoft-maintained Visual Studio Tools for Unity extension .
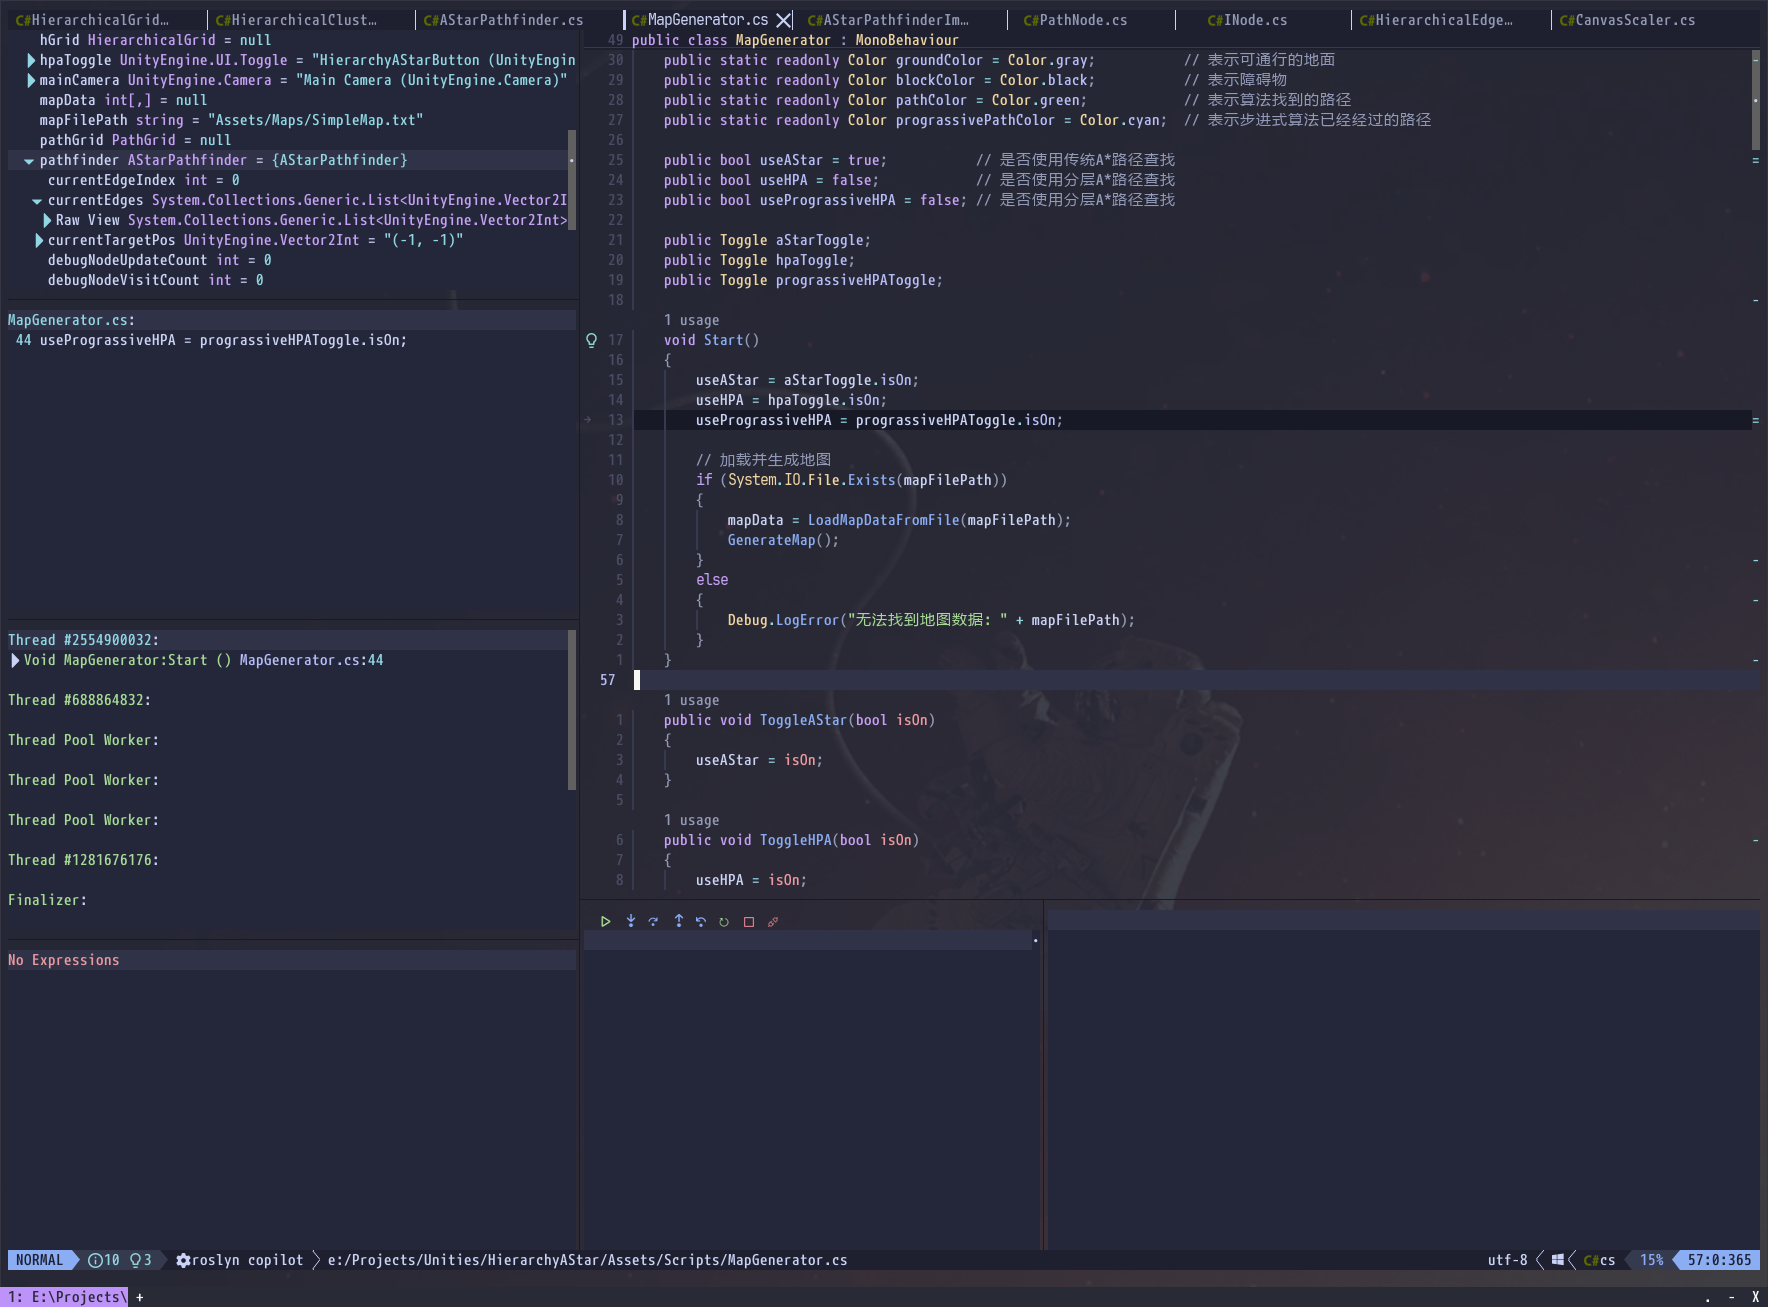
The configuration has also changed accordingly. Thankfully, after a lot of digging through forums (and with some help from ChatGPT), I eventually managed to get Unity debugging working in Neovim!
nvim-dap-unity
During my research, I noticed that plugins aimed at “improving Unity DAP deployment” were basically nonexistent. So I decided to go a step further and package my work into a plugin to share with others.
Although I don’t expect many Unity developers to use Neovim as their primary tool (Rider is still objectively the better choice), I hope it can help fellow Neovim enthusiasts like myself.

This plugin mainly does three things to ensure an “out-of-the-box” Unity debugging experience:
- Automatically downloads the VS Code Tools for Unity debugger and extracts it into the
nvimdatadirectory (Windows / macOS / Linux).- Installed automatically when using Lazy, or manually via the
NvimDapUnityInstallcommand.
- Installed automatically when using Lazy, or manually via the
- Configures default launch configurations for nvim-dap (e.g. “Attach Unity Editor”).
- Also supports merging with existing C# (.NET) DAP configurations.
- Automatically searches for and loads the appropriate DLLs from the Unity project when starting a debug session.
The plugin has been tested on Windows, macOS, and even Linux (the Linux testing took me quite some time 😂).
Finally for reference, here is my nvim-dap.lua configuration:
return {
    "mfussenegger/nvim-dap",
    dependencies = {
        "nvim-neotest/nvim-nio",
        "rcarriga/nvim-dap-ui",
        {
            "ownself/nvim-dap-unity",
            -- to make sure install and setup "vscodedebugger" for unity
            build = function()
                require("nvim-dap-unity").install()
            end,
        },
    },

    -- Lazy loading key
    keys = {
        { "<F5>", function() require("dap").continue() end, desc = "DAP Continue", mode = "n" },
        { "<F8>", function() require("dapui").toggle() end, desc = "DAP UI Toggle", mode = "n" },
        { "<F9>", function() require("dap").toggle_breakpoint() end, desc = "DAP Toggle Breakpoint", mode = "n" },
        { "<F10>", function() require("dap").step_over() end, desc = "DAP Step Over", mode = "n" },
        { "<F11>", function() require("dap").step_into() end, desc = "DAP Step Into", mode = "n" },
        { "<F12>", function() require("dap").step_out() end, desc = "DAP Step Out", mode = "n" },
    },
    -- Lazy loading cmd
    cmd = { "Dap", "DapContinue", "DapStepOver", "DapStepInto", "DapStepOut", "DapToggleBreakpoint", "DapUI", "DapLaunch", "DapAttach" },

    config = function()

        local dap = require("dap")
        local dapui = require("dapui")

        dapui.setup() -- initialize dapui

        require("nvim-dap-unity").setup()

        -- Dap UI
        dap.listeners.after.event_initialized["dapui_config"] = function()
            dapui.open()
        end
        dap.listeners.after.event_terminated["dapui_config"] = function()
            dapui.close()
        end
        dap.listeners.after.event_exited["dapui_config"] = function()
            dapui.close()
        end

        -- Dap keymaps
        vim.keymap.set('n', '<F5>', function() dap.continue() end)
        vim.keymap.set('n', '<F8>', function() dapui.toggle() end)
        vim.keymap.set('n', '<F9>', function() dap.toggle_breakpoint() end)
        vim.keymap.set('n', '<F10>', function() dap.step_over() end)
        vim.keymap.set('n', '<F11>', function() dap.step_into() end)
        vim.keymap.set('n', '<F12>', function() dap.step_out() end)
    end,
}
If you have any questions or suggestions, feel free to leave a comment, send me an email, or open an issue on GitHub. Thanks for reading and for using the plugin!
前情及动机
我是一个游戏开发工程师,主要是在客户端相关的领域,使用Unity或者Unreal这样的引擎(因此我的工作平台似乎永远的被限制在了Windows上 😢),在过去许多年里我的编程工具组合发生过多轮的演化,但主要分为以下几个阶段:
- Visual Studio / Code Warrior / Xcode : 在我刚开始职业生涯的4年间,主要从事PSP/Wii平台的Console游戏的开发,这个阶段我基本使用平台推荐的开发工具(开箱即用),但那个年代的编辑器无论是语法智能还是调试工具都无法和现在的工具同日而语
- SublimeText : 之后我开始接触和学习Vim,而ST的出现以及对Vim Motion的不错的支持,让我可以以较低的学习曲线走进Vim的世界。大约6年的时间里我以SublimeText为主力编辑器来进行我的开发工作,只有偶尔需要Debug的时候,我才会迫不得已的用一下Visual Studio(对,我是Log党)
- VS / Rider : 之后的几年里我经常需要在不同的项目之间做切换,智能联想对我开始变得更加重要和有用起来,于是我又回到了Visual Studio(VisVim)中,大约在2020年左右接触到了Rider,是有些被惊艳到的,可以说那时候的Rider集智能、速度、美观于一体,而且其Vim插件IdeaVim也是我用过的几个编辑器里面做的比较优秀的一个,甚至还能支持Unity Shader的函数跳转,那几年的编码体验无疑是幸福的
- Neovim : GVim时代我一直没有太认真的花力气去配置,虽然它有着一等公民的Vim体验,但其他方面确实还是落后太多了,而Neovim的出现让这一差距不再明显,因为它有了对LSP和DAP的支持(感谢VSCode),断断续续的一年半的时间,我逐渐将Neovim配置到了一个非常可用的状态,而此时Rider在我工作的项目中开始表现越来越糟糕,启动缓慢,占用内存经常性的达到10GB,有几个特定的版本甚至还有内存泄漏问题……
于是在2025年年底,我终于正式使用Neovim代替Rider作为我在工作环境下使用的”IDE”
Neovim Basic Setup
每个人的Neovim的设定都不尽相同,这也是Neovim最大的魅力,制定外观、Keymap以及必要的插件等等,如果我们从头详尽的说起,可能需要写上几万字,因此这篇小文不会覆盖这部分的说明了,如果你是Neovim的新手,我推荐你观看Josean的Youtube教程:
- How I Setup Neovim To Make It AMAZING in 2024: The Ultimate Guide
- How to Setup Neovim LSP Like A Pro in 2025 (v0.11+)
他的视频对新手非常友好,而且内容详尽,相信足以帮助大家上手基础的配置
LSP和DAP
想要让Neovim可以很好的在Unity的工程中工作,这部分将是这篇文章主要讲解的,确实在网上也并不能找到很多相关的文章(大概很少有Unity开发者会使用Neovim来作为主力开发工具吧笑)
LSP全称是Language Server Protocal,主要用于不同语言的智能联想支持的,DAP全称是Debug Adapter Protocol,适用于调试器的接口规范,这两个协议都是VSCode提出并发扬光大的,由于是开放协议它也造福了一众现代开源的代码编辑器,包括Neovim、Helix还有Zed,它们对智能联想和调试功能的支持都是依托于LSP和DAP
而让Neovim很好支持Unity的开发关键在于如何配置好LSP和DAP!
LSP : Roslyn.nvim
我最早配置的Neovim的C#支持的时候,使用的是OmniSharp,其表现并不是很令人满意,主要是速度方面,稍微大一点的工程跳转个函数定义都要1~2秒才能有反应
当然我现在也不确定是不是我自己的配置不当造成的原因(因为现在OmniSharp项目实际上也是使用Roslyn作为后台了),但当时的使用体验感觉OmniSharp难堪重任
直到后来发现了一个比较新的使用Roslyn的Neovim LSP插件:Roslyn.nvim
2026/03/09更新:原始的Roslyn.nvim插件主要是为Dotnet项目服务,对于Unity的项目支持上是存在一些问题的,且原作者不希望大幅改变插件的逻辑(PR),所以我在我的Fork中做了很多围绕Unity的改动,现在推荐大家使用我的Fork仓库的版本
目前更推荐的方式是使用基于Roslyn LSP的插件Roslyn.nvim
这个插件对比上游仓库的针对Unity的部分优化改动:
- 更健壮的sln/csproj选择机制
- 当无法在多个sln/csproj中自动选择时,会弹窗提示用户进行选择
- 真正意义上支持同一个Session打开多个sln
- 提供了:Roslyn config来动态切换工程的配置
- 默认支持不生效的宏所包含的代码使用“灰色”的语法高亮
此外,这个插件的初始化速度以及函数跳转都令人印象深刻,而且还支持像”Inlay hints”这样的高级LSP功能
Ramboe在他的Youtube频道中有关于这个插件的非常不错的介绍:
- Neovim + C# in 2025: Roslyn LSP Changes Everything
- Neovim + C# in 2025: The Actually Improved Setup roslyn.nvim + rzsl.nvim
在他的视频里也介绍了DAP的一些配置,但他的配置主要是为了Dotnet项目所服务的,而非Unity项目。不过你仍然可以从他的视频中了解到DAP是如何工作的,为我们后面的配置做准备
让我们回到LSP上,所幸Roslyn.nvim是同时支持Dotnet和Unity项目的,以下是我的Neovim中的Roslyn.nvim的配置方式:
首先你需要在你的Mason的配置中(Josean的第一个视频教程中有关于Mason的讲解)添加Roslyn(目前Roslyn还没有正式被Mason收录)
require("mason").setup({
    registries = {
        "github:mason-org/mason-registry",
        "github:Crashdummyy/mason-registry",
    },
})
这之后你就可以使用:Mason来打开菜单并安装Roslyn了:
之后通过Lazy添加Roslyn.nvim插件本身:
return {
    "seblyng/roslyn.nvim",
    ft = { "cs" },
    opts = {
        -- your configuration comes here; leave empty for default settings
        filewatching = "off", -- currently other options lead huge performance dropping
    },
}
这里的filewatching = "off"默认值是”auto”,这也是我目前使用Roslyn.nvim主要遇到的一个问题,我工作的项目中C#的源代码文件已经超过10万了,如果使用默认值的话每次保存文件都会引起2~3秒的卡顿,因此我暂时通过这个设置来解决问题,代价是我偶尔在文件改动后需要通过Keymap来手动启动一下LSP Server:
vim.keymap.set("n", "<leader>lr", function()
    vim.cmd("LspRestart")
end, { noremap = true, desc = "Restart LSP Server and enable Copilot" })
最后你可能还需要在配置目录的after/lsp/roslyn.lua中设定LSP的具体功能(Neovim 0.11+的方式,可以参考Josean的第二个视频):
return {
    settings = {
        ["csharp|inlay_hints"] = {
            csharp_enable_inlay_hints_for_implicit_object_creation = true,
            csharp_enable_inlay_hints_for_implicit_variable_types = true,
            csharp_enable_inlay_hints_for_lambda_parameter_types = true,
            csharp_enable_inlay_hints_for_types = true,
            dotnet_enable_inlay_hints_for_indexer_parameters = true,
            dotnet_enable_inlay_hints_for_literal_parameters = true,
            dotnet_enable_inlay_hints_for_object_creation_parameters = true,
            dotnet_enable_inlay_hints_for_other_parameters = true,
            dotnet_enable_inlay_hints_for_parameters = true,
            dotnet_suppress_inlay_hints_for_parameters_that_differ_only_by_suffix = true,
            dotnet_suppress_inlay_hints_for_parameters_that_match_argument_name = true,
            dotnet_suppress_inlay_hints_for_parameters_that_match_method_intent = true,
        },
        -- so far we use symbol-usage.nvim for this function
        -- ["csharp|code_lens"] = {
        -- 	dotnet_enable_references_code_lens = true,
        -- },
    },
}
DAP : nvim-dap
在Ramboe的视频中已经有了一些如何设置nvim-dap的基础内容,插件本身的安装和使用并不算太复杂,但比较让人生畏的是对应语言的dap工具的安装以及配置
所幸nvim-dap的官方组织了一个Wiki页面
大致的流程是你需要下载你所使用的语言的dap工具(大部分情况需要添加到PATH环境变量中),之后使用Wiki中默认配置就已经可以勉强工作了,之所以说勉强是因为很多语言例如C#、Rust、C++在你启动调试的时候,还需要你手动指定所要调试的可执行文件的位置
细心的话,在上面nvim-dap的Wiki中也已经找到了介绍了Unity的Dap Debugger如何设置,不过遗憾的在我的尝试中发现官方Wiki介绍的方法实际上已经是过时的了,因为VSCode中的Unity Debugger已经从Unity编写的工具改为了微软自家维护的Unity插件
而且配置方式也有些不同,所幸最终在各种论坛+ChatGPT的帮助下,我还是成功的让Unity的Debugger在Neovim下跑通了!
nvim-dap-unity
调研的过程中,我发现似乎“改进Unity-Dap部署”类型的插件在市面上还是个空白,于是决定再接再厉,干脆把我的工作封装成一个插件分享出来,虽然我想可能不会有太多Unity开发者会使用Neovim作为它们的主力开发工具(Rider确实还是目前更好的选择),但总还是有可能帮到一些像我一样的Neovim爱好者的吧
这个插件主要做了三件工作以确保你可以有一个“开箱即用”的Unity Debug体验:
- 自动下载vscode tool for unity并解压至nvimdata目录(Windows/MacOS/Linux全平台)
- 使用Lazy安装时会自动安装,或者可以使用
NvimDapUnityInstall命令来手动安装
- 使用Lazy安装时会自动安装,或者可以使用
- 为nvim-dap配置好默认的启动命令(”Attatch Unity Editor”)
- 同时支持与现有的C#的(dotnet)dap配置进行合并
- 启动调试的时候自动搜索并加载Unity工程下对应的dll文件
插件我在Windows、MacOS甚至是Linux(Linux下的测试可是花了不少时间,笑)都进行过测试了
为了便于参考,以下是我的nvim-dap.lua的配置文件:
return {
    "mfussenegger/nvim-dap",
    dependencies = {
        "nvim-neotest/nvim-nio",
        "rcarriga/nvim-dap-ui",
        {
            "ownself/nvim-dap-unity",
            -- to make sure install and setup "vscodedebugger" for unity
            build = function()
                require("nvim-dap-unity").install()
            end,
        },
    },

    -- Lazy loading key
    keys = {
        { "<F5>", function() require("dap").continue() end, desc = "DAP Continue", mode = "n" },
        { "<F8>", function() require("dapui").toggle() end, desc = "DAP UI Toggle", mode = "n" },
        { "<F9>", function() require("dap").toggle_breakpoint() end, desc = "DAP Toggle Breakpoint", mode = "n" },
        { "<F10>", function() require("dap").step_over() end, desc = "DAP Step Over", mode = "n" },
        { "<F11>", function() require("dap").step_into() end, desc = "DAP Step Into", mode = "n" },
        { "<F12>", function() require("dap").step_out() end, desc = "DAP Step Out", mode = "n" },
    },
    -- Lazy loading cmd
    cmd = { "Dap", "DapContinue", "DapStepOver", "DapStepInto", "DapStepOut", "DapToggleBreakpoint", "DapUI", "DapLaunch", "DapAttach" },

    config = function()

        local dap = require("dap")
        local dapui = require("dapui")

        dapui.setup() -- initialize dapui

        require("nvim-dap-unity").setup()

        -- Dap UI
        dap.listeners.after.event_initialized["dapui_config"] = function()
            dapui.open()
        end
        dap.listeners.after.event_terminated["dapui_config"] = function()
            dapui.close()
        end
        dap.listeners.after.event_exited["dapui_config"] = function()
            dapui.close()
        end

        -- Dap keymaps
        vim.keymap.set('n', '<F5>', function() dap.continue() end)
        vim.keymap.set('n', '<F8>', function() dapui.toggle() end)
        vim.keymap.set('n', '<F9>', function() dap.toggle_breakpoint() end)
        vim.keymap.set('n', '<F10>', function() dap.step_over() end)
        vim.keymap.set('n', '<F11>', function() dap.step_into() end)
        vim.keymap.set('n', '<F12>', function() dap.step_out() end)
    end,
}
如有问题和建议欢迎留言,或者给我发邮件,也可以直接在Github上提issue,感谢关注和使用!